This guide is for PMs, designers, founders, and first-time app builders who want to ship a real app to real users without heavy setup or maintenance.
It will take you from a blank canvas to a shareable full-stack CRUD app in one focused sprint.
We’ll be building a small feature voting board. You can add ideas, upvote them, and mark their status. Here’s a bit of what the finished version can do:
We’ll craft the UI in Fusion, use Supabase for data and auth, and deploy to Netlify. You’ll see the exact prompts, a few quick tweaks, and a short checklist to confirm everything works.
Builder’s Fusion turns your prompts and surgical visual edits into real code in a real repo, and you can review changes as clean pull requests. It’s a full-fledged visual IDE, so you can conduct all your product work in one place, and not just have another throwaway AI sandbox.
First we’ll get a working Wishboard live in the fastest path. Then we’ll add some optional upgrades, like sign-in and filtering.
- Create an account, then open Projects and start typing in the text box up top. No stack selection needed since the default starter is already set up.
- Paste this prompt (or write your own for your own app idea):
Create a small “Wishboard” feature voting app using shadcn/ui.
Add an Ideas page with a header, an “Add idea” form (title and short description), a list of ideas with visible vote counts and a Vote button on each card, plus simple Status and Tag filters as placeholders.
Make it work without connecting a database yet by using a temporary placeholder so the list updates immediately and resets if I refresh.
- Let Fusion build, and then you can interact with your app. It’s all real code you can tweak and preview.
shadcn/ui gives you accessible, tasteful components that are great for fast iteration, but you can always swap out the design system later.
It’s important to remember that, as with all AI tools, while you may get great results on first prompt, it’s through intentional iteration that you get production-grade applications.
When I used the above prompt, for instance, Fusion competently made a nice layout and basic functionality, but it added some things (in my case, a filtering mechanism) that are there visually but don’t actually work yet.
This is just a quirk of AI interpreting what you want, as it tries to show you what the app can be, even though the underlying code hasn’t necessarily caught up.
When this happens, it’s very easy to fix. QA your application and make a list of broken things. Then, submit that list to Fusion. In just another prompt (or two), your app should be functioning as you like.
You can, of course, do the same for visual upgrades, Prompting any AI with language when you need visual changes can get messy, so Fusion specifically allows visual editing (”design mode”) to make this process easier.
Feel free to try out some tweaks in the chat or visual editor now to get a feel for the prompt → preview → polish loop. Future models may be better at “one shotting,” but with today’s state-of-the-art, expect to prompt two or three times to get your features just right.
This fundamental AI loop is why we’ve built Fusion on top of Git version control, as you’ll see below.
Version control turns your project into a safe place to experiment. When you connect GitHub, every change becomes a pull request with clear history, review, and easy rollbacks. Fusion is built to work this way, so shipping feels like normal team workflow instead of a one-off sandbox.
If Git is new to you, you can read this primer for a friendly walkthrough of branches, PRs, and why version history is a creative safety net.
To create a brand new repo, without touching the GitHub UI:
- In your Fusion project, click Create Repo in the top right.
- Authorize GitHub, pick an owner, and confirm.
- Builder provisions a fresh repository and links it to your project. You now have branches, pull requests, and CI checks just like any other codebase.
Prefer your own codebase? Use Connect Repo on the Projects page to link an existing repo. Fusion will keep committing through standard pull requests so your code stays in your infrastructure.
Supabase is where your app keeps its stuff. It is a secure place in the cloud for data and for user sign-in.
Connecting it lets your prompts do real work: create the ideas and votes tables and connect the form and list to live data.
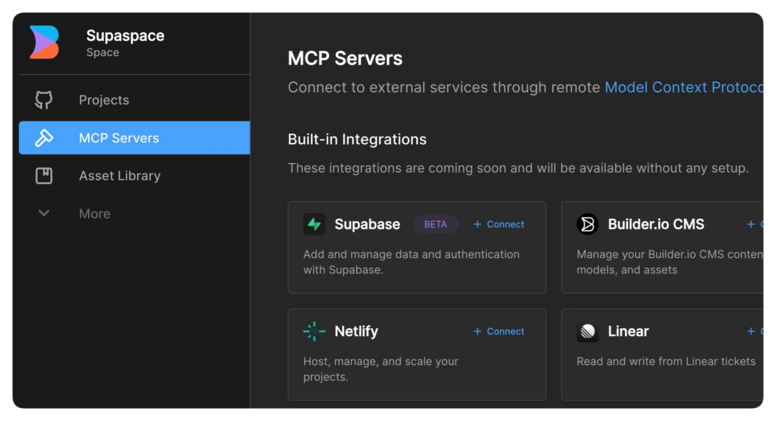
MCP servers are how you let Fusion use your tools on your behalf. You click “Sign in and approve” for each service, and Fusion gets permission to do specific tasks for you, like creating a database table or starting a deploy.
That one approval replaces a lot of manual setup: no copying keys to env files, no wiring URLs, no jumping between dashboards. You tell the AI what you want, and it can do the busywork safely inside your accounts.
To connect to Supabase:
- Create a Supabase account.
- In Fusion, open MCP Servers and connect Supabase. Pick your Supabase org during OAuth.

-
Sanity check in chat:
Use the Supabase MCP to create a new Supabase project, set up the data, and connect our app.
Create whatever tables and fields you need for a Wishboard with ideas, votes, tags, comments, and a simple status.
Turn the existing Ideas page into a live view backed by Supabase: add idea, list ideas with vote counts, and allow voting.
Do not require sign-in yet.
Put any needed keys in the Fusion project environment, then summarize what you created and which parts of the app you updated.
The Supabase MCP exposes tools for managing tables and fetching config so the agent can complete this entire task end-to-end.
You can check that the AI agent was successful by locating the new project in your Supabase account and confirming the data exists there. Feel free to edit data in a Supabase table directly to see the changes reflected in your app.
Without MCP, you would need to create databases and tables by hand, install clients, find keys, and stitch UI to API calls yourself. Here, the agent handles setup and wiring from a single prompt.
This article demonstrates more of the Supabase MCP’s capabilities with Fusion.
Netlify is how your app goes live. It gives you a public link you can share, and it updates the site whenever you make changes.
To get it set up with Fusion:
- Create a Netlify account.
- In Fusion, connect the Netlify MCP. Authorize, then the agent can create a site, trigger a build, and manage deploys through Netlify’s API and CLI.
-
Ask for a first deploy:
Use the Netlify MCP to create a new Netlify site from this GitHub repo and run the initial deploy. Return the live URL.
If the site needs secrets later, the Netlify MCP supports setting environment variables on the project.
So, that’s the whole setup: make the two accounts, OAuth both servers in Fusion, and let the agent do the heavy lifting.
You now have a working Wishboard with real hosting.
You can definitely stop here, but if you’d like to keep refining, here are some more tips and tricks on using Fusion effectively. You can:
- Prompt the AI to use the Supabase MCP to add user authentication. This lets users sign in, so that votes and ideas attach to a real account and follow them across devices.
- Directly import Figma frames to have the AI transform any design into a real, working component.
- Ask the AI to use the Context7 MCP server to get the latest docs for any libraries you’d like to use, such as GSAP animations.
- Grab inspos from other websites via the Builder Chrome extension and have AI recreate them in your app’s style.
- Visually edit anything you see, so that your app looks exactly how you want.
- Invite your entire team to prototype and merge new features to production alongside you.
Remember, as you prompt, if anything isn’t working as planned, don’t panic. Tell the AI what is going wrong and ask it to iterate.
You’re one prompt away from a live app. Here’s the fast path recap:
- Create a Builder account and start a new Fusion project.
- Paste the Wishboard prompt and let Fusion build.
- Click Create Repo to link GitHub.
- Connect Supabase and Netlify in MCP, approve access.
- Ask Fusion to publish and copy your live URL.
- Optional: add one-click sign-in so votes and comments follow a user.
Ready to ship your first app? Open Fusion, prompt, and share your creation with your team today.
Builder.io visually edits code, uses your design system, and sends pull requests.
Builder.io visually edits code, uses your design system, and sends pull requests.


 Connect a Repo


